Skip to content
ThinkforceOne

ThinkforceOne

Solutions to help you achieve more with your tools.

  • Home
  • Windows
  • Mac OS
  • MS Office
  • TextScript
  • Printing
  • CAD
  • Design
  • Hardware
  • About
  • Toggle search form

Capture a screenshot on Mac OS

Posted on 2022-05-182024-11-05 By Alan Salihi

Screenshots on Mac are usually saved directly to you Desktop folder. This is the direct save-to-hard disk scenario.
During the creation of the screenshot, you will see a small preview in the lower right corner of the screen for a few second. If you click on the preview, a small program will bring up the screen shot for you to crop it or edit it before saving it to the Desktop. Otherwise, wait few seconds, and the screenshot will be saved on your Desktop as a PNG file.

You can also capture the screenshot and keep it in the Clipboard until you decide to paste it in another program.

Capture using Keyboard Shortcuts

Usually you capture with Command + Number.
If you add Control + Command + Numer > then you store the capture in the Clipboard rather than as a file .

Capture to clipboard 📋

  • Capture a region of the screen

    Take a screenshot for a region of the display and keep it in the Clipboard:

    1. Hold the keys Command + Control + Shift + 4.
    2. Make window selection of the area you want to capture.
    3. Switch to the app where you want to paste the captured content, then press the keys: Command + V.

Capture to disk 💾

  • Capture a region of the screen

    Take a screenshot for a region of the display

    1. Hold the keys Command + Shift + 4.
    2. Drag the mouse cursor to draw a rectangle indicating the area of the screenshot image.
  • Capture an app window

    Capture a screenshot for a window or a menu:

    1. Bring the window that you want to capture to the front.
    2. Press and hold: Shift + Command + Space + 4
      The pointer changes to a camera icon.
    3. To cancel taking the screenshot, press the Esc (Escape) key.
  • Whole display

    Take a screenshot for the whole display:
    Hold the keys Command + Shift + 3.

Capturing using Mouse or Software

  • Press Shift + Command + 5 (or use Launchpad) to open Screenshot and display the tools.
    Icons from left to right:
    1. Capture the entire screen
    2. Capture a window
    3. Capture a portion of the screen
    4. Record the entire screen
    5. Record a portion of the screen
    • You can use the Screenshot app also to capture videos.

For more details, see: Mark up files on Mac – Apple Support

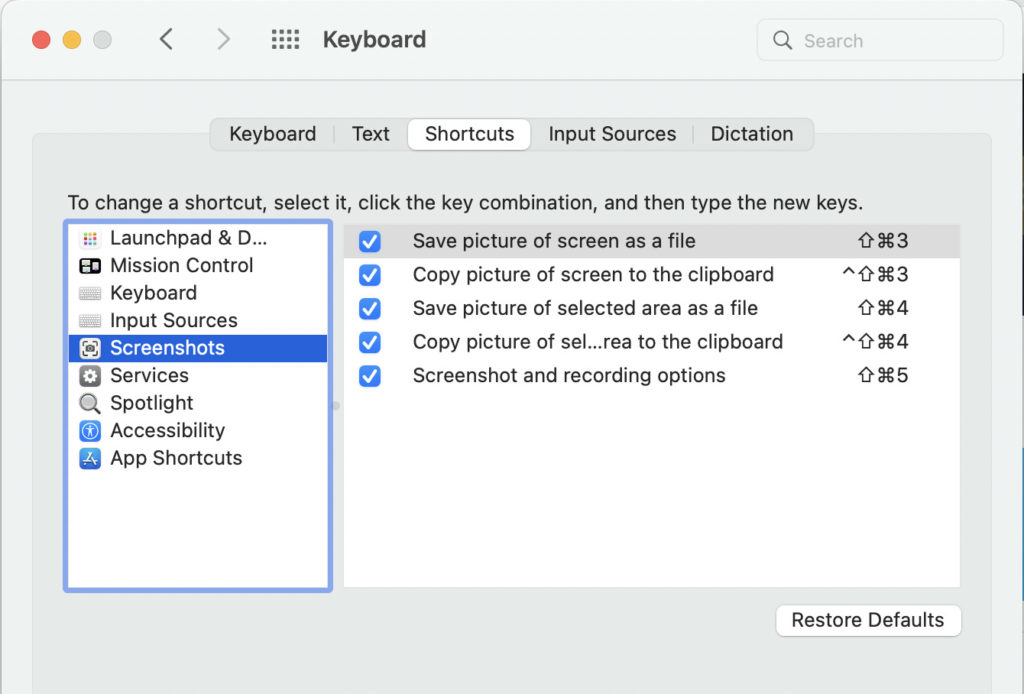
Where to find and change existing keyboard shortcuts for screenshot capture

From the App menu > System Preferences > Keyboard > Shortcuts.
By double-clicking a shortcut, you can change it and type a new one.

Post Views: 10
Mac OS, Tech Tags:capture, keyboard shortcut, Mac OS, screenshot, shortcut

Post navigation

Previous Post: Inserting relative and absolue coordinates in AutoCAD
Next Post: Capture a screenshot on Windows

Related Posts

Print from Chrome browser shows a blank page Printing
Copy File Path on macOS Mac OS
Switch between Chrome profiles on Mac OS using keyboard shortcuts Mac OS
Folder Security Permissions hero Change Folder Permission under Windows 11 and 10 Tech
Create macros in Notepad++: EOL Break lines or join lines using custom delimiter Tech
How to add escape (Esc) ASCII character to a text script file? AutoCAD

Share this

CATAGORIES

Categories

  • AutoCAD
  • CAD
  • Canva
  • Design
  • Hardware
  • iOS
  • Mac OS
  • MS Excel
  • MS Office
  • MS OneNote
  • MS Word
  • PDF
  • Printing
  • Tech
  • TextScript
  • Uncategorized
  • Windows
POSTS

Post

  • December 2024
  • November 2024
  • June 2024
  • May 2024
  • April 2024
  • February 2024
  • December 2023
  • August 2023
  • April 2023
  • March 2023
  • December 2022
  • November 2022
  • July 2022
  • June 2022
  • May 2022

About

  • Privacy Policy
  • About
  • Contact
  • Copyrights

Connect with us

  • Facebook
  • Twitter
  • Instagram
  • YouTube
May 2022
M T W T F S S
 1
2345678
9101112131415
16171819202122
23242526272829
3031  
    Jun »

Copyright © 2025 ThinkforceOne.

Powered by PressBook Grid Blogs theme

We are using cookies to give you the best experience on our website.

You can find out more about which cookies we are using or switch them off in .

ThinkforceOne
Powered by  GDPR Cookie Compliance
Privacy Overview

This website uses cookies so that we can provide you with the best user experience possible. Cookie information is stored in your browser and performs functions such as recognising you when you return to our website and helping our team to understand which sections of the website you find most interesting and useful.

Strictly Necessary Cookies

Strictly Necessary Cookie should be enabled at all times so that we can save your preferences for cookie settings.

If you disable this cookie, we will not be able to save your preferences. This means that every time you visit this website you will need to enable or disable cookies again.